


Children love to learn about birds! From the time they can look out the window and recognize moving creatures they fall in love with them. Learning about birds opens the door to many other important concepts like the seasons, migration, taking care of young, nesting, and habitats. Starting a backyard bird journal or simply looking up different kinds of birds for identification is a great way to ignite a love of science and creation. We keep a handy Bird Guide near by our windows for a quick look up of each bird we see. If you’re near the Pacific Northwest I highly recommend purchasing Birds of Oregon and a set of Timber Press Field Guides, they have amazing photos, thick glossy pages, and enough information to last your children through adulthood.
Suggested Resources for a Unit Study:


Printable Template
Print up your template on cardstock or watercolor paper. You will need one template per child, and your final project will be facing the opposite direction of the seahorse template

Step 1
Cut out punch out small bits of bleeding tissue paper. Bleeding tissue paper is different then standard tissue paper. You can purchase bleeding Tissue paper at your local craft store on with the resource link above

Step 2
Take a moment to look at your seahorse and decide what colors you might put around what part. I suggest you encourage children to start with warm colors on top, cool colors on bottom and maybe a cool color near the ends of the fin. Otherwise when you mix the blues, greens and reds you start to get brown :)

Step 3
Turn your seahorse template over so that you’re working on the backside of the paper. Using a small paintbrush and a dab of water begin arranging your tissue paper onto your paper.

Step 4
As your paper gets wet it will start to bleed the color and blend with surrounding colors for a stunning effect.

Step 5
You can always lift your paper to be sure that you’ve added color to the entire template.

Step 6
Allow your tissue paper to dry a bit and then carefully peel off the tissue paper. The color will remain

Step 7
After your paper has dried completely (use a hair dryer if you are impatient or doing this in a single classroom setting) you can begin to cut out your shapes. I suggest cutting these out one at a time then assembling them. Younger children will need help with the cutting so be sure to plan for that if you’re doing this project with multiple young students.

Step 8
Using a piece of black construction paper as your background, begin to assemble your seahorse parts. You’ll want to leave black spaces shinning through.

Step 9
As you add more and more pieces you can see your seahorse come to life.
Step 10
Be sure to look at a reference paper if you can’t remember how the seahorse was supposed to look

Step 11
Arrange all of your pieces and get them to your liking before gluing to your paper

Step 12
One at a time, glue your pieces to your paper. We only put glue in the middle of each piece and founded the edges a bit so that our seahorses appear to come off the paper with a 3D effect.

Step 13
Cut a small almond shape eye from your scrap paper if you like.

Step 14
You can stop here if you like, your seahorse is beautiful!

Step 15
Or you can use a small grey or black marker to add in some texture to your seahorse. Try adding dots, circles, half circles along the back edge of your seahorse

Step 16
You can add small lines across your seahorse fins

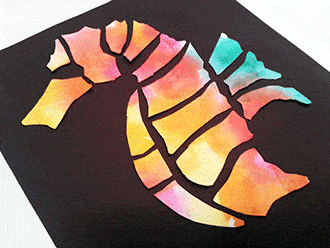
All Done!
Stand back and marvel at your beautiful sea creature! These look amazing lined up next to each other as every one comes out differently and each child glues their seahorse back together in a different way. Encourage children to make more paper templates and cut out their own sea creatures or backgrounds. For example, greens and blues can be cut out to make seaweed, bright orange would make coral, etc…….use this opportunity to introduce children to the art of paper cutting from their own art.
Suggested Resources for a Unit Study:


Leave a Reply